前面已经分析完了Flutter程序初始化的的过程,当FlutterView创建完成之后,Engine已经准备好了。这个时候FlutterView被设置到Activity上,并且增加了对应的LaunchView。然后偶FlutterActivityDelegate会开始执行Flutter程序。
 public void onCreate(Bundle savedInstanceState) {

        String[] args = getArgsFromIntent(activity.getIntent());
        FlutterMain.ensureInitializationComplete(activity.getApplicationContext(), args);

        flutterView = viewFactory.createFlutterView(activity);
        if (flutterView == null) {
            FlutterNativeView nativeView = viewFactory.createFlutterNativeView();
            flutterView = new FlutterView(activity, null, nativeView);
            flutterView.setLayoutParams(matchParent);
            activity.setContentView(flutterView);
            launchView = createLaunchView();
            if (launchView != null) {
                addLaunchView();
            }
        }

        if (loadIntent(activity.getIntent())) {
            return;
        }

        String appBundlePath = FlutterMain.findAppBundlePath(activity.getApplicationContext());
        if (appBundlePath != null) {
            runBundle(appBundlePath);
        }
    }
前面我们已经分析过了runBundle方法在Java层的实现,最终调用了FlutterJNI的方法:
private void runFromBundleInternal(String[] bundlePaths, String entrypoint,
String libraryPath) {
assertAttached();
if (applicationIsRunning)
throw new AssertionError(
"This Flutter engine instance is already running an application");
mFlutterJNI.runBundleAndSnapshotFromLibrary(
bundlePaths,
entrypoint,
libraryPath,
mContext.getResources().getAssets()
);
applicationIsRunning = true;
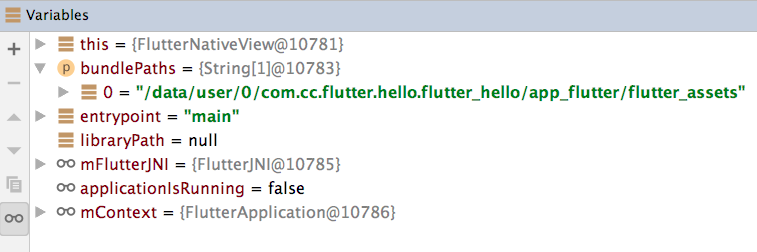
}对于我们Demo来说,传给Engine的参数如下:
这里有哦一点要注意,就是applicationIsRunning 变量,从前面初始化分析我们知道,一个FlutterView对应一个Engine实例,我们可以考虑复用FlutterView,但是FlutterNativeView会有这个判断。不允许多次运行。所以要复用还要做更多的工作。
  @UiThread
  public void runBundleAndSnapshotFromLibrary(
      @NonNull String[] prioritizedBundlePaths,
      @Nullable String entrypointFunctionName,
      @Nullable String pathToEntrypointFunction,
      @NonNull AssetManager assetManager
  ) {
    ensureAttachedToNative();
    nativeRunBundleAndSnapshotFromLibrary(
        nativePlatformViewId,
        prioritizedBundlePaths,
        entrypointFunctionName,
        pathToEntrypointFunction,
        assetManager
    );
  }
调用native的方法,其中多了一个参数是nativePlatformViewId, 从前面分析我们知道这个就是AndroidShellHolder对象在native层的地址。因为可能有多个Shell,所以通过这种方式把Java层和Native的对象关联起来。下面是运行的大致流程图(点击查看大图)
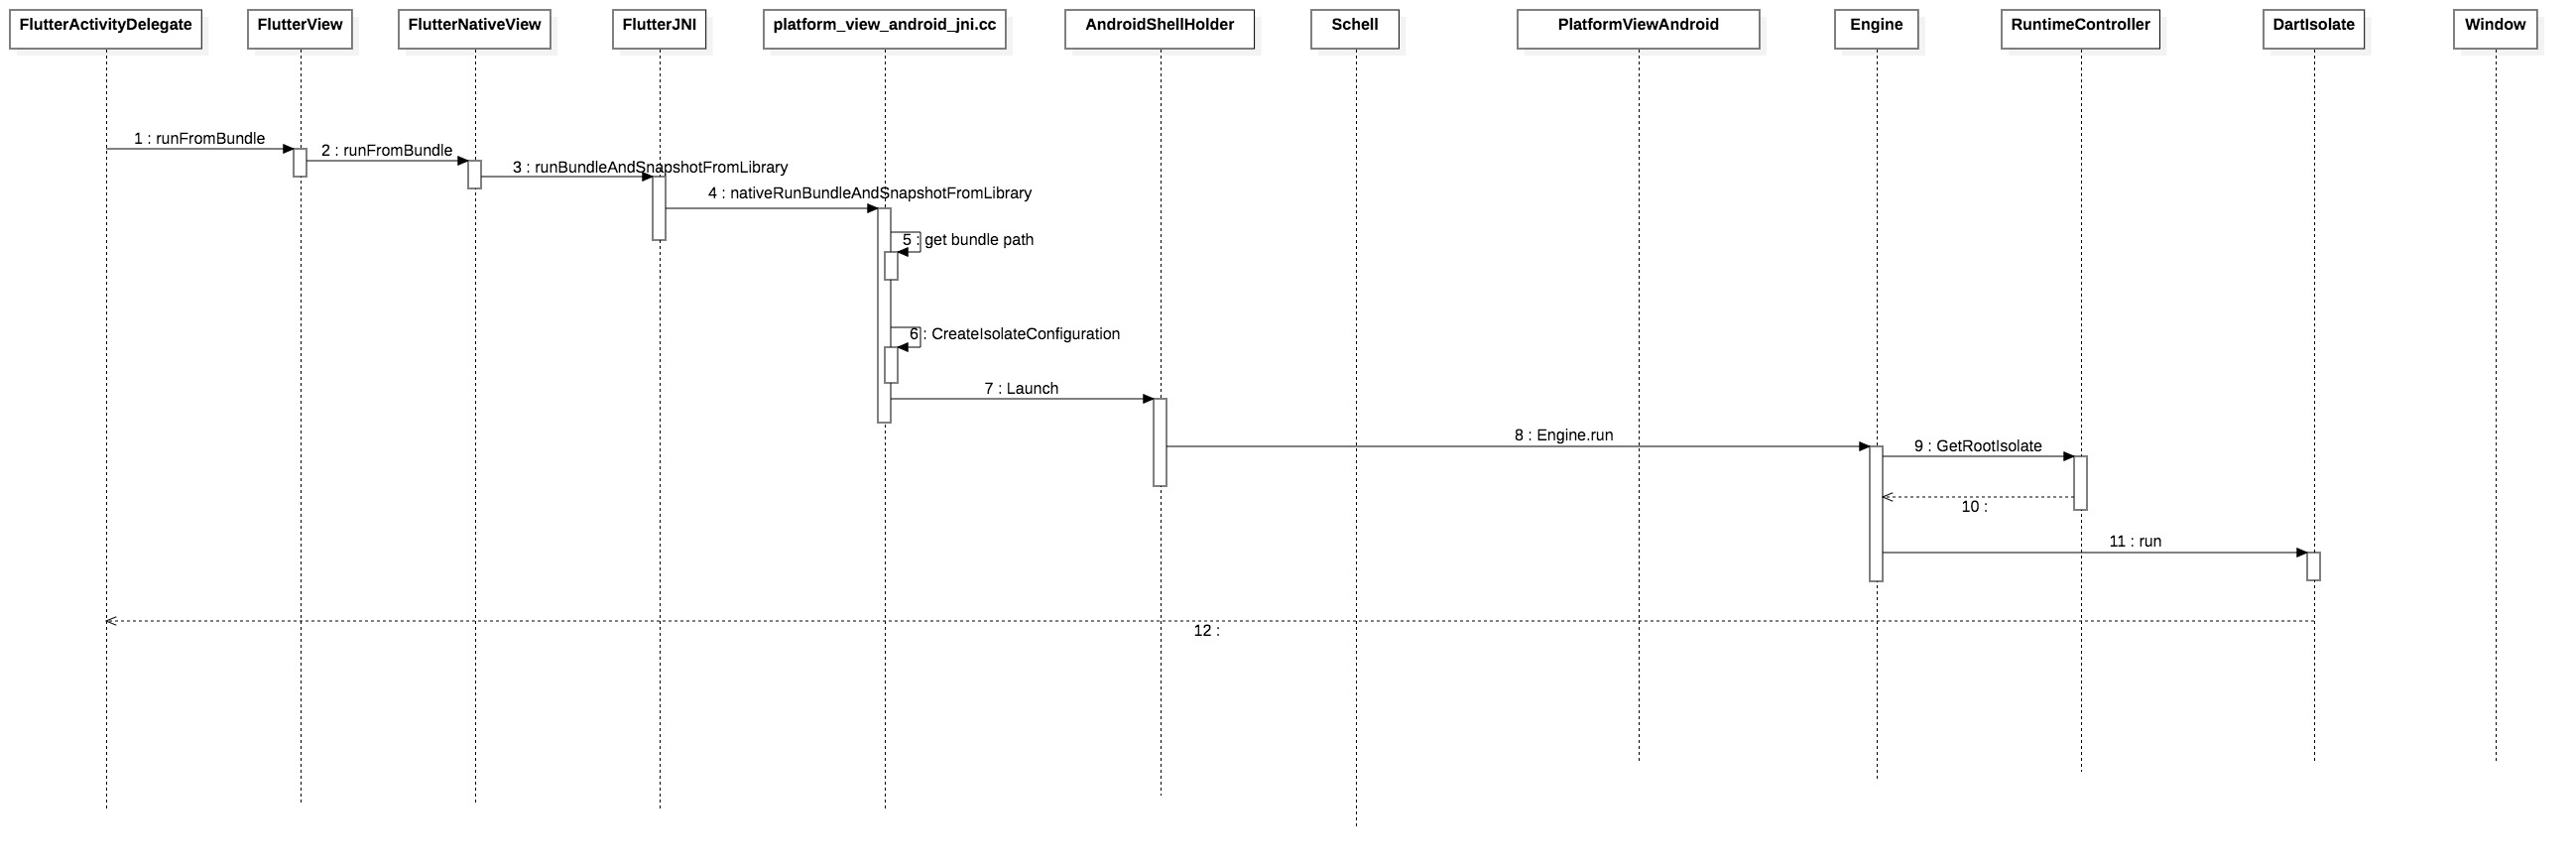
运行Flutter程序
在Engine中的,对应的native方法如下,因为是FlutterJNI调用,所以代码在platform_view_android_jni.cc文件中
static void RunBundleAndSnapshotFromLibrary(JNIEnv* env,
                                            jobject jcaller,
                                            jlong shell_holder,
                                            jobjectArray jbundlepaths,
                                            jstring jEntrypoint,
                                            jstring jLibraryUrl,
                                            jobject jAssetManager)
我们一步步看看这个方法是实现
1. 创建AssetManager
auto asset_manager = std::make_shared<blink::AssetManager>();
  for (const auto& bundlepath :
       fml::jni::StringArrayToVector(env, jbundlepaths)) {
    if (bundlepath.empty()) {
      continue;
    }

    // If we got a bundle path, attempt to use that as a directory asset
    // bundle or a zip asset bundle.
    const auto file_ext_index = bundlepath.rfind(".");
    if (bundlepath.substr(file_ext_index) == ".zip") {
      asset_manager->PushBack(
          std::make_unique<blink::ZipAssetStore>(bundlepath, "flutter_assets"));
    } else {
      asset_manager->PushBack(
          std::make_unique<blink::DirectoryAssetBundle>(fml::OpenDirectory(
              bundlepath.c_str(), false, fml::FilePermission::kRead)));

      // Use the last path component of the bundle path to determine the
      // directory in the APK assets.
      const auto last_slash_index = bundlepath.rfind("/", bundlepath.size());
      if (last_slash_index != std::string::npos) {
        auto apk_asset_dir = bundlepath.substr(
            last_slash_index + 1, bundlepath.size() - last_slash_index);

        asset_manager->PushBack(std::make_unique<blink::APKAssetProvider>(
            env,                       // jni environment
            jAssetManager,             // asset manager
            std::move(apk_asset_dir))  // apk asset dir
        );
      }
    }
}这一段主要是获取要执行的bundle的路径。这里创建了一个Native层的AssetManager对象来保存这些信息。 查看传入的是zip包还是文件夹。我们Demo传入的是本地的文件夹路径,所以这里往asset_manager中存入了本机的文件路径,以及APK中flutter_asset目录。(使用了Java层的AssertManager来处理APK包)
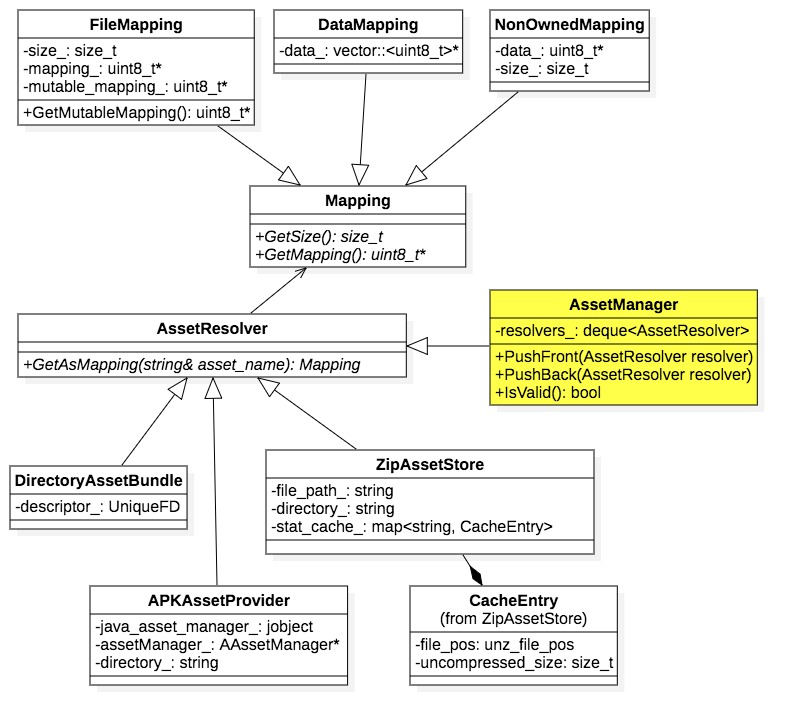
看下相关的UML结构, 这里AssertResolver定义了统一获取asset的接口,支持文件夹、APK、ZIP三种。 他们使用不同Mapping来解析这些asset,统一返回地址。AssetManaget用来在所有的AseetResolver中返回指定的asset。
2. 创建配置信息
  auto isolate_configuration = CreateIsolateConfiguration(*asset_manager);
  if (!isolate_configuration) {
    FML_DLOG(ERROR)
        << "Isolate configuration could not be determined for engine launch.";
    return;
}这里根据前面创建的asset_manager生成了IsolateConfiguration对象
std::unique_ptr<IsolateConfiguration> CreateIsolateConfiguration(
    const blink::AssetManager& asset_manager) {

  //检查DartVM是否只能运行编译后的snapshot文件
  if (blink::DartVM::IsRunningPrecompiledCode()) {
    return IsolateConfiguration::CreateForAppSnapshot();
  }

  //定义了一个函数
  const auto configuration_from_blob =
      [&asset_manager](const std::string& snapshot_name)
      -> std::unique_ptr<IsolateConfiguration> {

    // 查找是否有指定的asset
    auto blob = asset_manager.GetAsMapping(snapshot_name);
    auto delta = asset_manager.GetAsMapping("kernel_delta.bin");
    if (blob && delta) {
      std::vector<std::unique_ptr<fml::Mapping>> kernels;
      kernels.emplace_back(std::move(blob));
      kernels.emplace_back(std::move(delta));
      return IsolateConfiguration::CreateForKernelList(std::move(kernels));
    }
    if (blob) {
      return IsolateConfiguration::CreateForKernel(std::move(blob));
    }
    if (delta) {
      return IsolateConfiguration::CreateForKernel(std::move(delta));
    }
    return nullptr;
  };

  //执行上面的函数
  if (auto kernel = configuration_from_blob("kernel_blob.bin")) {
    return kernel;
  }

  // This happens when starting isolate directly from CoreJIT snapshot.
  return IsolateConfiguration::CreateForAppSnapshot();
}
上面就是根据asset_manager中包含的asset来创建不同的isolate配置对象,大致规则是:
- 如果DartVM只能执行编译的snapshot,那么创建AppSnapshotIsolateConfiguration
- 如果包含kernel_blob.bin和kernel_delta.bin文件,那么创建KernelListIsolateConfiguration
- 如果包含kernel_blob.bin或kernel_delta.bin其中一个文件,那么创建KernelIsolateConfiguration
- 如果都不满足,默认创建AppSnapshotIsolateConfiguration
前面说过kernel_blob.bin是debug模式下的代码文件,是kernel snapshot所以创建了对应的配置文件。
RunConfiguration config(std::move(isolate_configuration),
std::move(asset_manager));最后出创建了运行是的配置对象RunConfiguration,它的成员如下
 private:
  std::unique_ptr<IsolateConfiguration> isolate_configuration_;
  std::shared_ptr<blink::AssetManager> asset_manager_;
  std::string entrypoint_ = "main";
  std::string entrypoint_library_ = "";
把传入的参数设置到config中去,这里entrypoint是main,而libraryUrl是null
  {
    auto entrypoint = fml::jni::JavaStringToString(env, jEntrypoint);
    auto libraryUrl = fml::jni::JavaStringToString(env, jLibraryUrl);

    if ((entrypoint.size() > 0) && (libraryUrl.size() > 0)) {
      config.SetEntrypointAndLibrary(std::move(entrypoint),
                                     std::move(libraryUrl));
    } else if (entrypoint.size() > 0) {
      config.SetEntrypoint(std::move(entrypoint));
    }
  }
3 运行
ANDROID_SHELL_HOLDER->Launch(std::move(config));这里是一个宏,实际是把我们从Java层传入的shell_holder地址转为对应的对象
#define ANDROID_SHELL_HOLDER \
  (reinterpret_cast<shell::AndroidShellHolder*>(shell_holder))
这个操作从platform thread切换到了UI thread, Flutter程序的执行是交给了Engine处理。
void AndroidShellHolder::Launch(RunConfiguration config) {
  if (!IsValid()) {
    return;
  }

  shell_->GetTaskRunners().GetUITaskRunner()->PostTask(
      fml::MakeCopyable([engine = shell_->GetEngine(),  //
                         config = std::move(config)     //
  ]() mutable {
        FML_LOG(INFO) << "Attempting to launch engine configuration...";
        if (!engine || engine->Run(std::move(config)) ==
                           shell::Engine::RunStatus::Failure) {
          FML_LOG(ERROR) << "Could not launch engine in configuration.";
        } else {
          FML_LOG(INFO) << "Isolate for engine configuration successfully "
                           "started and run.";
        }
      }));
}
Engine执行程序
下面是Engine的执行代码
Engine::RunStatus Engine::Run(RunConfiguration configuration) {

  // 准备并运行Isolate
  auto isolate_launch_status =
      PrepareAndLaunchIsolate(std::move(configuration));
  if (isolate_launch_status == Engine::RunStatus::Failure) {
    FML_LOG(ERROR) << "Engine not prepare and launch isolate.";
    return isolate_launch_status;
  } else if (isolate_launch_status ==
             Engine::RunStatus::FailureAlreadyRunning) {
    return isolate_launch_status;
  }

  // 获取当前的isolate
  std::shared_ptr<blink::DartIsolate> isolate =
      runtime_controller_->GetRootIsolate().lock();

  bool isolate_running =
      isolate && isolate->GetPhase() == blink::DartIsolate::Phase::Running;
  if (isolate_running) {
    tonic::DartState::Scope scope(isolate.get());

    // 如果isolate运行了执行回调
    if (settings_.root_isolate_create_callback) {
      settings_.root_isolate_create_callback();
    }

    // 注册执行完成关闭后的回调
    if (settings_.root_isolate_shutdown_callback) {
      isolate->AddIsolateShutdownCallback(
          settings_.root_isolate_shutdown_callback);
    }
  }

  // 返回运行状态
  return isolate_running ? Engine::RunStatus::Success
                         : Engine::RunStatus::Failure;
}从上面看,最重要的是PrepareAndLaunchIsolate方法
shell::Engine::RunStatus Engine::PrepareAndLaunchIsolate(
    RunConfiguration configuration) {

  //1. 设置Engine中的asset_manager_ 和 font_collection_
  UpdateAssetManager(configuration.GetAssetManager());

  auto isolate_configuration = configuration.TakeIsolateConfiguration();

  //2. 获取rootIsolate
  std::shared_ptr<blink::DartIsolate> isolate =
      runtime_controller_->GetRootIsolate().lock();

  if (!isolate) {
    return RunStatus::Failure;
  }

  // This can happen on iOS after a plugin shows a native window and returns to
  // the Flutter ViewController.
  if (isolate->GetPhase() == blink::DartIsolate::Phase::Running) {
    FML_DLOG(WARNING) << "Isolate was already running!";
    return RunStatus::FailureAlreadyRunning;
  }

  //3. 通过配置文件配置isolate
  if (!isolate_configuration->PrepareIsolate(*isolate)) {
    FML_LOG(ERROR) << "Could not prepare to run the isolate.";
    return RunStatus::Failure;
  }

  //4. 运行isolaote
  if (configuration.GetEntrypointLibrary().empty()) {
    if (!isolate->Run(configuration.GetEntrypoint())) {
      FML_LOG(ERROR) << "Could not run the isolate.";
      return RunStatus::Failure;
    }
  } else {
    if (!isolate->RunFromLibrary(configuration.GetEntrypointLibrary(),
                                 configuration.GetEntrypoint())) {
      FML_LOG(ERROR) << "Could not run the isolate.";
      return RunStatus::Failure;
    }
  }

  return RunStatus::Success;
}
整个代码可以分4步:
1. UpdateAssetManager
bool Engine::UpdateAssetManager(
    std::shared_ptr<blink::AssetManager> new_asset_manager) {
  if (asset_manager_ == new_asset_manager) {
    return false;
  }

  asset_manager_ = new_asset_manager;

  if (!asset_manager_) {
    return false;
  }

  // Using libTXT as the text engine.
  font_collection_.RegisterFonts(asset_manager_);

  if (settings_.use_test_fonts) {
    font_collection_.RegisterTestFonts();
  }

  return true;
}
代码很简单,设置了Engine中的asset_mamager_成员变量,同时设置了字体引擎,这里不做深入了解。
2 获取isolate
这里是从RuntimeController中获取root isolate,上一篇在介绍初始化时,创建RuntimeController时候,创建了root_isolate对象
DartIsolate::CreateRootIsolate(vm_,
                           isolate_snapshot_,
                           shared_snapshot_,
                           task_runners_,
                           std::make_unique<Window>(this),
                           snapshot_delegate_,
                           io_manager_,
                           p_advisory_script_uri,
                           p_advisory_script_entrypoint)
我们看一下DartIsolate对象的成员变量,主要保存了要执行的isolate SNAPSHOT或则是kernel SNAPSHOT (父类还保存了一些信息,比如Window)。
 DartVM* const vm_ = nullptr;
  Phase phase_ = Phase::Unknown;
  const fml::RefPtr<DartSnapshot> isolate_snapshot_;
  const fml::RefPtr<DartSnapshot> shared_snapshot_;
  std::vector<std::shared_ptr<const fml::Mapping>> kernel_buffers_;
  std::vector<std::unique_ptr<AutoFireClosure>> shutdown_callbacks_;
  ChildIsolatePreparer child_isolate_preparer_ = nullptr;
3 prepareIsolate
bool IsolateConfiguration::PrepareIsolate(blink::DartIsolate& isolate) {
  if (isolate.GetPhase() != blink::DartIsolate::Phase::LibrariesSetup) {
    FML_DLOG(ERROR)
        << "Isolate was in incorrect phase to be prepared for running.";
    return false;
  }

  return DoPrepareIsolate(isolate);
}这里的DoPrepareIsolate是被重写了的,会根据前面创建配置信息是具体的配置信息执行不同的操作。
当我们是Release包时是,执行的AppSnapshotIsolateConfiguration中的实现方法
bool DartIsolate::PrepareForRunningFromPrecompiledCode() {
  TRACE_EVENT0("flutter", "DartIsolate::PrepareForRunningFromPrecompiledCode");
  if (phase_ != Phase::LibrariesSetup) {
    return false;
  }

  tonic::DartState::Scope scope(this);

  if (Dart_IsNull(Dart_RootLibrary())) {
    return false;
  }

  if (!MarkIsolateRunnable()) {
    return false;
  }

  child_isolate_preparer_ = [](DartIsolate* isolate) {
    return isolate->PrepareForRunningFromPrecompiledCode();
  };
  phase_ = Phase::Ready;
  return true;
}
标红的是最终要的方法,里面主要调用了Dart的三个方法。退出当前执行的isolate,准备要执行的isolate,进入当前要执行的isolate。整个过程有点象换CD一样。 一个Isolate是一张CD,而Engine是CD播放器。
  // There must be no current isolate to mark an isolate as being runnable.
  Dart_ExitIsolate();

  Dart_IsolateMakeRunnable(isolate());

  // Success. Restore the isolate.
  Dart_EnterIsolate(isolate());
而对于Debug包来说,执行的是KernelIsolateConfiguration下的实现
  bool DoPrepareIsolate(blink::DartIsolate& isolate) override {
    if (blink::DartVM::IsRunningPrecompiledCode()) {
      return false;
    }
    return isolate.PrepareForRunningFromKernel(std::move(kernel_));
}其中kernel_变量是kernel_blob.bin文件内存映射的地址
bool DartIsolate::PrepareForRunningFromKernel(
    std::shared_ptr<const fml::Mapping> mapping,
    bool last_piece) {
  TRACE_EVENT0("flutter", "DartIsolate::PrepareForRunningFromKernel");
  if (phase_ != Phase::LibrariesSetup) {
    return false;
  }

  if (DartVM::IsRunningPrecompiledCode()) {
    return false;
  }

  if (!mapping || mapping->GetSize() == 0) {
    return false;
  }

  tonic::DartState::Scope scope(this);

  // Use root library provided by kernel in favor of one provided by snapshot.
  Dart_SetRootLibrary(Dart_Null());

  if (!LoadKernel(mapping, last_piece)) {
    return false;
  }

  if (!last_piece) {
    // More to come.
    return true;
  }

  if (Dart_IsNull(Dart_RootLibrary())) {
    return false;
  }

  if (!MarkIsolateRunnable()) {
    return false;
  }

  // Child isolate shares root isolate embedder_isolate (lines 691 and 693
  // below). Re-initializing child_isolate_preparer_ lambda while it is being
  // executed leads to crashes.
  if (child_isolate_preparer_ == nullptr) {
    child_isolate_preparer_ = [buffers =
                                   kernel_buffers_](DartIsolate* isolate) {
      for (unsigned long i = 0; i < buffers.size(); i++) {
        bool last_piece = i + 1 == buffers.size();
        const std::shared_ptr<const fml::Mapping>& buffer = buffers.at(i);
        if (!isolate->PrepareForRunningFromKernel(buffer, last_piece)) {
          return false;
        }
      }
      return true;
    };
  }
  phase_ = Phase::Ready;
  return true;
}代码不少,我们还是只关注标红的,其中MarkIsolateRunnable已经介绍过了,主要看看LoadKernel
bool DartIsolate::LoadKernel(std::shared_ptr<const fml::Mapping> mapping,
                             bool last_piece) {
  if (!Dart_IsKernel(mapping->GetMapping(), mapping->GetSize())) {
    return false;
  }

  // Mapping must be retained until isolate shutdown.
  kernel_buffers_.push_back(mapping);

  Dart_Handle library =
      Dart_LoadLibraryFromKernel(mapping->GetMapping(), mapping->GetSize());
  if (tonic::LogIfError(library)) {
    return false;
  }

  if (!last_piece) {
    // More to come.
    return true;
  }

  Dart_SetRootLibrary(library);
  if (tonic::LogIfError(Dart_FinalizeLoading(false))) {
    return false;
  }
  return true;
}把DEBUG模式下的代码内存地址保存到了kernel_buffers_ 这个成员变量中,另外从kernel文件中获取了library,并设置给了Dart, 作用目前还不太清楚。 (注意,这里Dart_Handle并不是一个具体类型,而是DartVM用于GC的一个reference)
4 运行Isolate
bool DartIsolate::Run(const std::string& entrypoint_name) {
  TRACE_EVENT0("flutter", "DartIsolate::Run");
  if (phase_ != Phase::Ready) {
    return false;
  }

  tonic::DartState::Scope scope(this);

  auto user_entrypoint_function =
      Dart_GetField(Dart_RootLibrary(), tonic::ToDart(entrypoint_name.c_str()));

  if (!InvokeMainEntrypoint(user_entrypoint_function)) {
    return false;
  }

  phase_ = Phase::Running;
  FML_DLOG(INFO) << "New isolate is in the running state.";
  return true;
}
这里是获取了要执行的entrypoint,也就是要执行的方法,默认是mian方法
static bool InvokeMainEntrypoint(Dart_Handle user_entrypoint_function) {
  if (tonic::LogIfError(user_entrypoint_function)) {
    FML_LOG(ERROR) << "Could not resolve main entrypoint function.";
    return false;
  }

  Dart_Handle start_main_isolate_function =
      tonic::DartInvokeField(Dart_LookupLibrary(tonic::ToDart("dart:isolate")),
                             "_getStartMainIsolateFunction", {});

  if (tonic::LogIfError(start_main_isolate_function)) {
    FML_LOG(ERROR) << "Could not resolve main entrypoint trampoline.";
    return false;
  }

  if (tonic::LogIfError(tonic::DartInvokeField(
          Dart_LookupLibrary(tonic::ToDart("dart:ui")), "_runMainZoned",
          {start_main_isolate_function, user_entrypoint_function}))) {
    FML_LOG(ERROR) << "Could not invoke the main entrypoint.";
    return false;
  }

  return true;
}
以上都是调用了Dart的方法,从Dart SDK源码中可以找到, 路径dart/runtime/lib/isolate_patch.dart,
@pragma("vm:entry-point")
Function _getStartMainIsolateFunction() {
  return _startMainIsolate;
}
调用上面方法获得到的start_main_isolate_function 就是下面这个方法
void _startMainIsolate(Function entryPoint, List<String> args) {
  _startIsolate(
      null, // no parent port
      entryPoint,
      args,
      null, // no message
      true, // isSpawnUri
      null, // no control port
      null); // no capabilities
}
然后执行_runMainZoned, 并传入两个参数
void _runMainZoned(Function startMainIsolateFunction, Function userMainFunction) {
  startMainIsolateFunction((){
    runZoned<Future<void>>(() {
      const List<String> empty_args = <String>[];
      if (userMainFunction is _BinaryFunction) {
        // This seems to be undocumented but supported by the command line VM.
        // Let's do the same in case old entry-points are ported to Flutter.
        (userMainFunction as dynamic)(empty_args, '');
      } else if (userMainFunction is _UnaryFunction) {
        (userMainFunction as dynamic)(empty_args);
      } else {
        userMainFunction();
      }
    }, onError: (Object error, StackTrace stackTrace) {
      _reportUnhandledException(error.toString(), stackTrace.toString());
    });
  }, null);
}
这里先执了_startMainIsolate 然后执行我们指定的entrypoint。应该就是我们Demo源码中的main函数了
void main() => runApp(MyApp());这里已经涉及到Dart中如何去执行Isolate和代码了。我们暂时不在深入,这个时候DartVM已经开始执行我们isolate中的行数了,自此整个FlutterAPP启动执行的过程基本完成。
总结
整个运行的过程总体上开还是比较清晰,但是其中还有很多细节都无法深入,总结下来,执行流程大致是:
- 解析Java层传递下来的bundle参数,确定要被执行的源代码的位置
- 创建IsolateConfiguration,这里就区分了Release和Debug
- 把配置信息交给Engine,由Engine来执行
- Engine根据IsolateConfiguration,来设置DartIsolate
- Engine或退出前一个Isolate,并进入要执行的Isolate
- 从DartIsolate中找到要执行的entrypoint
- Engine调用DartVM来执行Isolate中的dart代码


d1