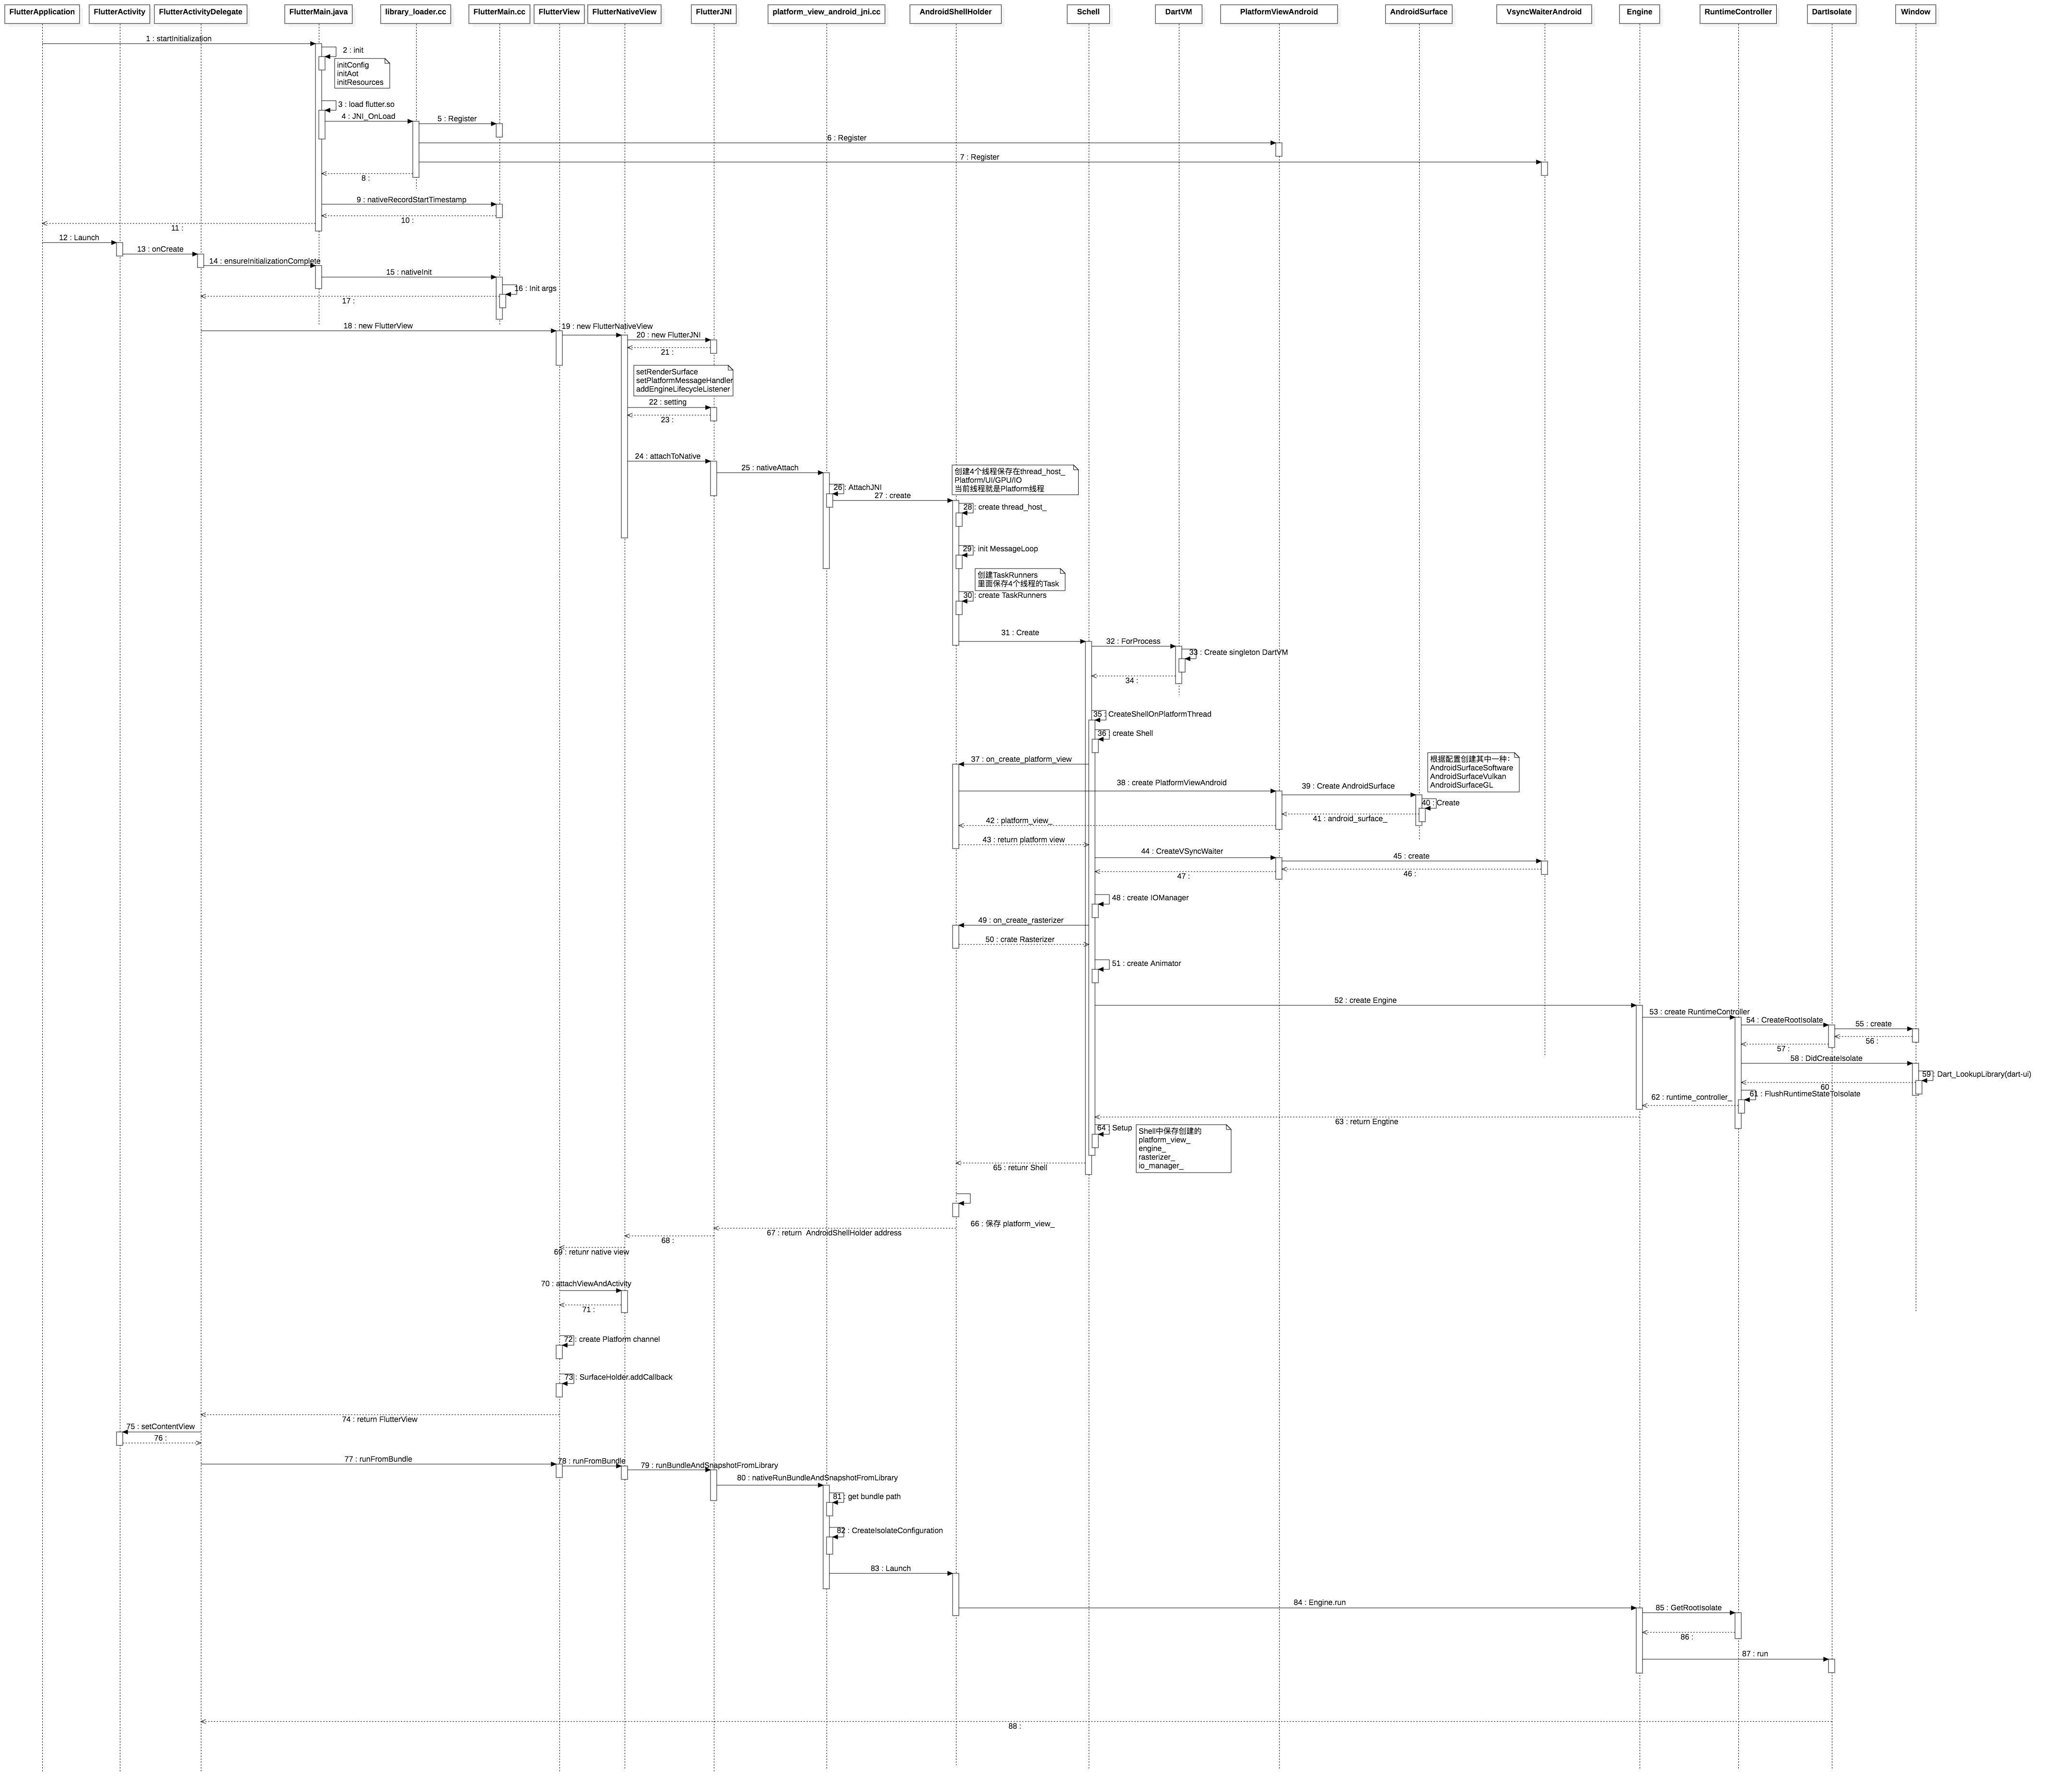
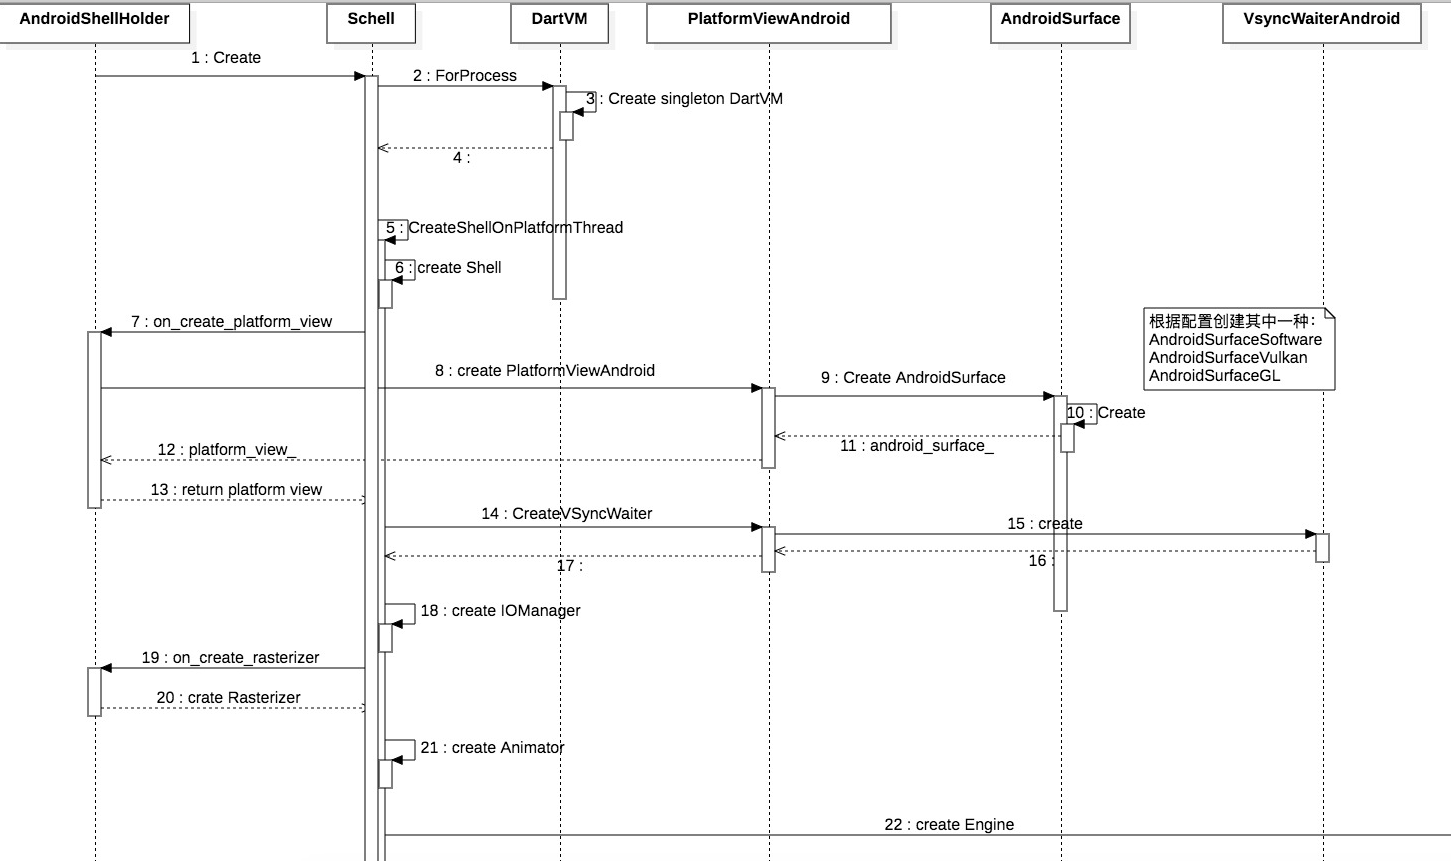
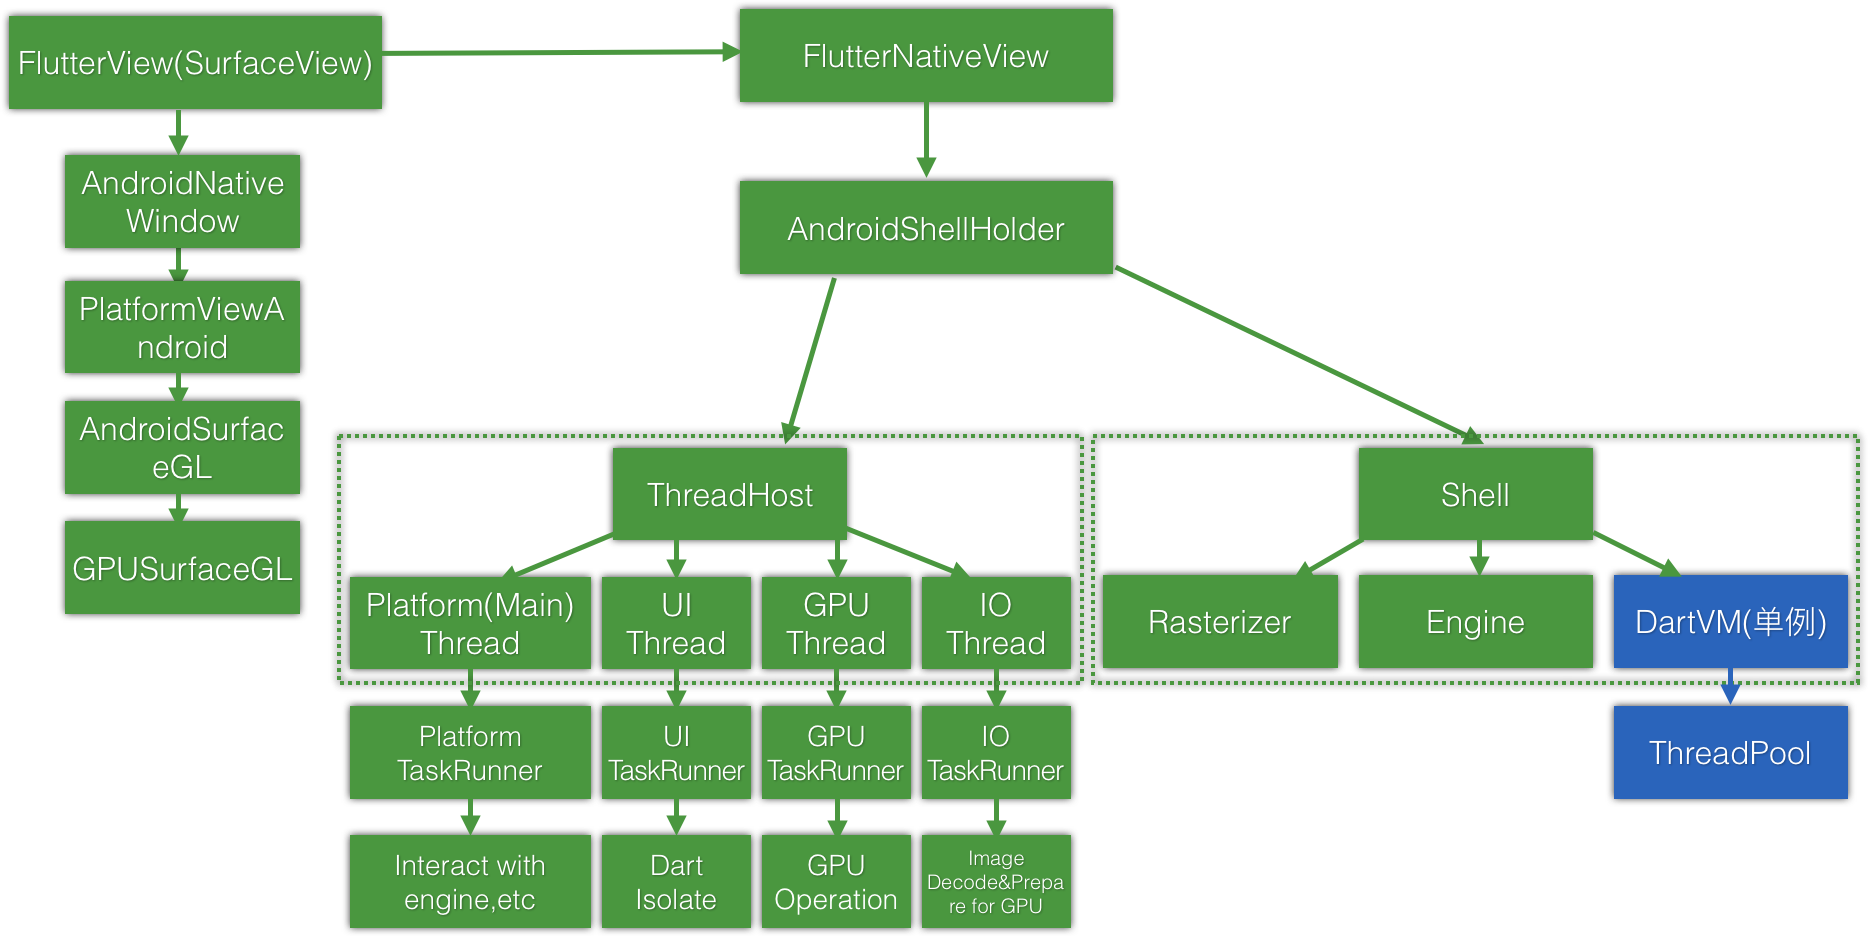
下图是AndroidShellHolder中创建Shell和PlatformView的流程,其实接着上一篇图的第13步,但是图太大了不好显示,就拆分开了。前一篇主要关注APP初始化到创建AndroidShellHolder的过程,而这一篇主要关注在创建Sehll对象。
Shell对象
和前面一样先来看看Shell的成员变量:
const blink::TaskRunners task_runners_;
  const blink::Settings settings_;
  fml::RefPtr<blink::DartVM> vm_;
  std::unique_ptr<PlatformView> platform_view_;  // on platform task runner
  std::unique_ptr<Engine> engine_;               // on UI task runner
  std::unique_ptr<Rasterizer> rasterizer_;       // on GPU task runner
  std::unique_ptr<IOManager> io_manager_;        // on IO task runner

  std::unordered_map<std::string,  // method
                     std::pair<fml::RefPtr<fml::TaskRunner>,
                               ServiceProtocolHandler>  // task-runner/function
                                                        // pair
                     >
      service_protocol_handlers_;
  bool is_setup_ = false;
Shell对象继承了4个类,通过查看Shell对象的头文件,Shell对象实现了代理模式,本身并不提供具体的功能,而是代理到对应的成员中。
class Shell final : public PlatformView::Delegate,
                    public Animator::Delegate,
                    public Engine::Delegate,
                    public blink::ServiceProtocol::Handler
下面就根据流程图,一步步分析这些成员变量是如何创建的
创建DartVM
std::unique_ptr<Shell> Shell::Create(
    blink::TaskRunners task_runners,
    blink::Settings settings,
    Shell::CreateCallback<PlatformView> on_create_platform_view,
    Shell::CreateCallback<Rasterizer> on_create_rasterizer) {
  PerformInitializationTasks(settings);

  auto vm = blink::DartVM::ForProcess(settings);
  FML_CHECK(vm) << "Must be able to initialize the VM.";
  return Shell::Create(std::move(task_runners),             //
                       std::move(settings),                 //
                       vm->GetIsolateSnapshot(),            //
                       blink::DartSnapshot::Empty(),        //
                       std::move(on_create_platform_view),  //
                       std::move(on_create_rasterizer)      //
  );
}
其中DartVM::ForProcess来创建了DartVM, 这里3个snapshot参数都是null,所以从settings中获取
fml::RefPtr<DartVM> DartVM::ForProcess(
    Settings settings,
    fml::RefPtr<DartSnapshot> vm_snapshot,
    fml::RefPtr<DartSnapshot> isolate_snapshot,
    fml::RefPtr<DartSnapshot> shared_snapshot) {
  std::lock_guard<std::mutex> lock(gVMMutex);
  std::call_once(gVMInitialization, [settings,          //
                                     vm_snapshot,       //
                                     isolate_snapshot,  //
                                     shared_snapshot    //
  ]() mutable {
    if (!vm_snapshot) {
      vm_snapshot = DartSnapshot::VMSnapshotFromSettings(settings);
    }
    if (!(vm_snapshot && vm_snapshot->IsValid())) {
      FML_LOG(ERROR) << "VM snapshot must be valid.";
      return;
    }
    if (!isolate_snapshot) {
      isolate_snapshot = DartSnapshot::IsolateSnapshotFromSettings(settings);
    }
    if (!(isolate_snapshot && isolate_snapshot->IsValid())) {
      FML_LOG(ERROR) << "Isolate snapshot must be valid.";
      return;
    }
    if (!shared_snapshot) {
      shared_snapshot = DartSnapshot::Empty();
    }

    // 上面从settings中获取vm和isolate的snapshot文件路径,然后创建成DartSnapshot对象,shared_snapshot为空
    gVM = fml::MakeRefCounted<DartVM>(settings,                     //
                                      std::move(vm_snapshot),       //
                                      std::move(isolate_snapshot),  //
                                      std::move(shared_snapshot)    //
    );
  });
  return gVM;
}
这里有个地方要注意,就是std:call_once这个标准库方法
Executes the Callable object
fexactly once, even if called concurrently, from several threads.
这里配合 static std::once_flag gVMInitialization, 实现了单例,所以对于一个Android程序来说,DartVM只有一个实例。
Settings这个对象我们已经比较熟悉了,snapshot是前面创建的,然后创建DartVM对象。 DartVM内部会把这3个Snapshot保存下来,然后初始化VM。
DartVM::DartVM(const Settings& settings,
fml::RefPtr<DartSnapshot> vm_snapshot,
fml::RefPtr<DartSnapshot> isolate_snapshot,
fml::RefPtr<DartSnapshot> shared_snapshot){
{
dart::bin::BootstrapDartIo();
if (!settings.temp_directory_path.empty()) {
dart::bin::SetSystemTempDirectory(settings.temp_directory_path.c_str());
}
}
std::vector<const char*> args;
char* flags_error = Dart_SetVMFlags(args.size(), args.data());
DartUI::InitForGlobal();
{
Dart_InitializeParams params = {};
params.version = DART_INITIALIZE_PARAMS_CURRENT_VERSION;
params.vm_snapshot_data = vm_snapshot_->GetData()->GetSnapshotPointer();
params.vm_snapshot_instructions = vm_snapshot_->GetInstructionsIfPresent(); //这里表示inst可能为空(DEBUG情况下就是空)
params.create = reinterpret_cast<decltype(params.create)>(
DartIsolate::DartIsolateCreateCallback);
params.shutdown = reinterpret_cast<decltype(params.shutdown)>(
DartIsolate::DartIsolateShutdownCallback);
params.cleanup = reinterpret_cast<decltype(params.cleanup)>(
DartIsolate::DartIsolateCleanupCallback);
params.thread_exit = ThreadExitCallback;
params.get_service_assets = GetVMServiceAssetsArchiveCallback;
params.entropy_source = DartIO::EntropySource;
char* init_error = Dart_Initialize(¶ms);
}
}对构造函数进行了精简,主要进行了4个操作:
- Bootstraps ‘dart:io’
- 设置虚拟机的FLAG,这里省略了构建args的过程,
- 把Native的方法注册到DartVM,这样从dart可以使用 (Dart调用c++可以参考: Dart API 扩展)
- 初始化Dart虚拟机, 这里从vm_snapshot中获取了指令和数据的地址,并设置了很多callback。 (有个问题,DEBUG模式下, settings里面没有设置kernel文件地址,构建的SNAPSHOT指令应该是空,但是我看了一下VM初始化的代码,有判断指令是否为空? )
这里要说明的是DartVM真正的的代码并不在Flutter Engine的源码中,而是在https://github.com/dart-lang/sdk ,对于我们来说就到此为止了。我们可以简单的认为这个时候DartVM已经初始化,已经可以执行dart程序了。这也为Flutter的运行打下了基础。
创建Shell
std::unique_ptr<Shell> shell;
  fml::TaskRunner::RunNowOrPostTask(
      task_runners.GetPlatformTaskRunner(),
      [&latch,                                          //
       &shell,                                          //
       task_runners = std::move(task_runners),          //
       settings,                                        //
       isolate_snapshot = std::move(isolate_snapshot),  //
       shared_snapshot = std::move(shared_snapshot),    //
       on_create_platform_view,                         //
       on_create_rasterizer                             //
  ]() {
        shell = CreateShellOnPlatformThread(std::move(task_runners),      //
                                            settings,                     //
                                            std::move(isolate_snapshot),  //
                                            std::move(shared_snapshot),   //
                                            on_create_platform_view,      //
                                            on_create_rasterizer          //
        );
        latch.Signal();
      });
这里可以看到Shell是在PlatformThread创建的,也就是当前APP的主线程。其中isolate_snapshot 是flutter应用程序的snapshot。Shell构造函数里只是设置了ServiceProtocol handler。
auto shell = std::unique_ptr<Shell>(new Shell(task_runners, settings));
创建PlatformView
  // Create the platform view on the platform thread (this thread).
  auto platform_view = on_create_platform_view(*shell.get());
  if (!platform_view || !platform_view->GetWeakPtr()) {
    return nullptr;
  }
这里其实调用的是上一篇中AndroidShellHolder中的方法, 创建了PlatformViewAndroid对象。这个对象继承与PlatformView对象。看看AndroidPlatformView的成员变量:
const fml::jni::JavaObjectWeakGlobalRef java_object_;  //Java FlutterJNI
const std::unique_ptr<AndroidSurface> android_surface_;

// PlatformView
PlatformView::Delegate& delegate_;   //Shell
const blink::TaskRunners task_runners_;
其他都没什么特别,主要关注android_surface_的创建。如果FlutterView在后台与运行,不需要显示,那就就不会创建android_surface_。
AndroidSurface::Create(use_software_rendering)std::unique_ptr<AndroidSurface> AndroidSurface::Create(
bool use_software_rendering) {
if (use_software_rendering) {
auto software_surface = std::make_unique<AndroidSurfaceSoftware>();
return software_surface->IsValid() ? std::move(software_surface) : nullptr;
}
#if SHELL_ENABLE_VULKAN
auto vulkan_surface = std::make_unique<AndroidSurfaceVulkan>();
return vulkan_surface->IsValid() ? std::move(vulkan_surface) : nullptr;
#else // SHELL_ENABLE_VULKAN
auto gl_surface = std::make_unique<AndroidSurfaceGL>();
return gl_surface->IsOffscreenContextValid() ? std::move(gl_surface)
: nullptr;
#endif // SHELL_ENABLE_VULKAN
}会根据用户是否设置了来创建不同的AndroidSurface,如果启动了软件渲染就创建AndroidSurfaceSoftware,否则根据配置启动VULKAN或则是OPENG,搜索了下,配置在flutter_engine/shell/config.gni下,默认是false
declare_args() {
  shell_enable_vulkan = false
}
Java层的SurfaceView
我们记得在FlutterView的构造函数中创建了SurfaceHolder.Callback,但是并没有直接去使用SurfaceHolder去绘制,而是通过FlutterNativeView的FlutterJNI把回调时间传给了Engine。
  mSurfaceCallback = new SurfaceHolder.Callback() {
            @Override
            public void surfaceCreated(SurfaceHolder holder) {
                assertAttached();
                mNativeView.getFlutterJNI().onSurfaceCreated(holder.getSurface());
            }

            @Override
            public void surfaceChanged(SurfaceHolder holder, int format, int width, int height) {
                assertAttached();
                mNativeView.getFlutterJNI().onSurfaceChanged(width, height);
            }

            @Override
            public void surfaceDestroyed(SurfaceHolder holder) {
                assertAttached();
                mNativeView.getFlutterJNI().onSurfaceDestroyed();
            }
        };
        getHolder().addCallback(mSurfaceCallback);
这3个回调对应的方法如下
static void SurfaceCreated(JNIEnv* env,
                           jobject jcaller,
                           jlong shell_holder,
                           jobject jsurface) {
  fml::jni::ScopedJavaLocalFrame scoped_local_reference_frame(env);
  auto window = fml::MakeRefCounted<AndroidNativeWindow>(
      ANativeWindow_fromSurface(env, jsurface));
  ANDROID_SHELL_HOLDER->GetPlatformView()->NotifyCreated(std::move(window));
}

static void SurfaceChanged(JNIEnv* env,
                           jobject jcaller,
                           jlong shell_holder,
                           jint width,
                           jint height) {
  ANDROID_SHELL_HOLDER->GetPlatformView()->NotifyChanged(
      SkISize::Make(width, height));
}

static void SurfaceDestroyed(JNIEnv* env, jobject jcaller, jlong shell_holder) {
  ANDROID_SHELL_HOLDER->GetPlatformView()->NotifyDestroyed();
}
最终调用到了AndroidPlatformView中的方法, 实际是调用了android_surface_成员变量的方法。注意一下SurfaceCreated方法里面,jsurface是java层传递下来的SurfaceView,而这里和ANativeWindow关联起来了。他是OpenGL在c++层的画布。
using Handle = ANativeWindow*;
Handle window_;

AndroidNativeWindow::AndroidNativeWindow(Handle window) : window_(window) {}
写到这里,我们知道PlatformView和FlutterView是一一对应的。我们可以看到FlutterNativeView中好多其他的的方法最终也是调用到了AndroidPlatformView中。关于UI的绘制和消息处理后面在慢慢学习,目前没必要深入。
创建IOManager
 std::unique_ptr<IOManager> io_manager;
  auto io_task_runner = shell->GetTaskRunners().GetIOTaskRunner();
  fml::TaskRunner::RunNowOrPostTask(
      io_task_runner,
      [&io_latch,       //
       &io_manager,     //
       &platform_view,  //
       io_task_runner   //
  ]() {
        io_manager = std::make_unique<IOManager>(
            platform_view->CreateResourceContext(), io_task_runner);
        io_latch.Signal();
      });
在IO线程创建IOManage,创建了一个GrContext对象。
sk_sp<GrContext> PlatformViewAndroid::CreateResourceContext() const {
  if (!android_surface_) {
    return nullptr;
  }
  sk_sp<GrContext> resource_context;
  if (android_surface_->ResourceContextMakeCurrent()) {
    resource_context = IOManager::CreateCompatibleResourceLoadingContext(
        GrBackend::kOpenGL_GrBackend);
  } else {
    FML_DLOG(ERROR) << "Could not make the resource context current.";
  }

  return resource_context;
}
GrContext是skia的对象,介绍如下:
GPU Surfaces must have a
GrContextobject which manages the GPU context, and related caches for textures and fonts. GrContexts are matched one to one with OpenGL contexts or Vulkan devices. That is, all SkSurfaces that will be rendered to using the same OpenGL context or Vulkan device should share a GrContext. Skia does not create a OpenGL context or Vulkan device for you. In OpenGL mode it also assumes that the correct OpenGL context has been made current to the current thread when Skia calls are made.
看一下IOManager的成员变量, 主要是GrContext, 目前还不清楚具体作用,看起来也是在渲染有关。
  sk_sp<GrContext> resource_context_;
  std::unique_ptr<fml::WeakPtrFactory<GrContext>>
      resource_context_weak_factory_;

  // Unref queue management.
  fml::RefPtr<flow::SkiaUnrefQueue> unref_queue_;
创建Rasterizer
std::unique_ptr<Rasterizer> rasterizer;
  fml::WeakPtr<blink::SnapshotDelegate> snapshot_delegate;
  fml::TaskRunner::RunNowOrPostTask(
      task_runners.GetGPUTaskRunner(), [&gpu_latch,            //
                                        &rasterizer,           //
                                        on_create_rasterizer,  //
                                        shell = shell.get(),   //
                                        &snapshot_delegate     //
  ]() {
        if (auto new_rasterizer = on_create_rasterizer(*shell)) {
          rasterizer = std::move(new_rasterizer);
          snapshot_delegate = rasterizer->GetSnapshotDelegate();
        }
        gpu_latch.Signal();
      });
和PlatformView类是,也是调用AndroidShellHolder的方法来创建Rasterizer对象, 在GPU线程中创建。
Rasterizer::Rasterizer(
    blink::TaskRunners task_runners,
    std::unique_ptr<flow::CompositorContext> compositor_context)
    : task_runners_(std::move(task_runners)),
      compositor_context_(std::move(compositor_context)),
      weak_factory_(this) {
  FML_DCHECK(compositor_context_);
}
看看他的成员变量,包含了layer_tree和compositor,它主要负责光栅化。
private:
  blink::TaskRunners task_runners_;
  std::unique_ptr<Surface> surface_;
  std::unique_ptr<flow::CompositorContext> compositor_context_;
  std::unique_ptr<flow::LayerTree> last_layer_tree_;
  fml::closure next_frame_callback_;
  fml::WeakPtrFactory<Rasterizer> weak_factory_;
创建Engine
std::unique_ptr<Engine> engine;
  fml::TaskRunner::RunNowOrPostTask(
      shell->GetTaskRunners().GetUITaskRunner(),
      fml::MakeCopyable([&ui_latch,                                         //
                         &engine,                                           //
                         shell = shell.get(),                               //
                         isolate_snapshot = std::move(isolate_snapshot),    //
                         shared_snapshot = std::move(shared_snapshot),      //
                         vsync_waiter = std::move(vsync_waiter),            //
                         snapshot_delegate = std::move(snapshot_delegate),  //
                         io_manager = io_manager->GetWeakPtr()              //
  ]() mutable {
        const auto& task_runners = shell->GetTaskRunners();

        // The animator is owned by the UI thread but it gets its vsync pulses
        // from the platform.
        auto animator = std::make_unique<Animator>(*shell, task_runners,
                                                   std::move(vsync_waiter));

        engine = std::make_unique<Engine>(*shell,                        //
                                          shell->GetDartVM(),            //
                                          std::move(isolate_snapshot),   //
                                          std::move(shared_snapshot),    //
                                          task_runners,                  //
                                          shell->GetSettings(),          //
                                          std::move(animator),           //
                                          std::move(snapshot_delegate),  //
                                          std::move(io_manager)          //
        );
        ui_latch.Signal();
      }));
这里的Engine主要是负责执行Dart代码,和我们说的Flutter Engine有些不同,Flutter Engine代表真个Flutter的低层实现,而这里Engine更具体。
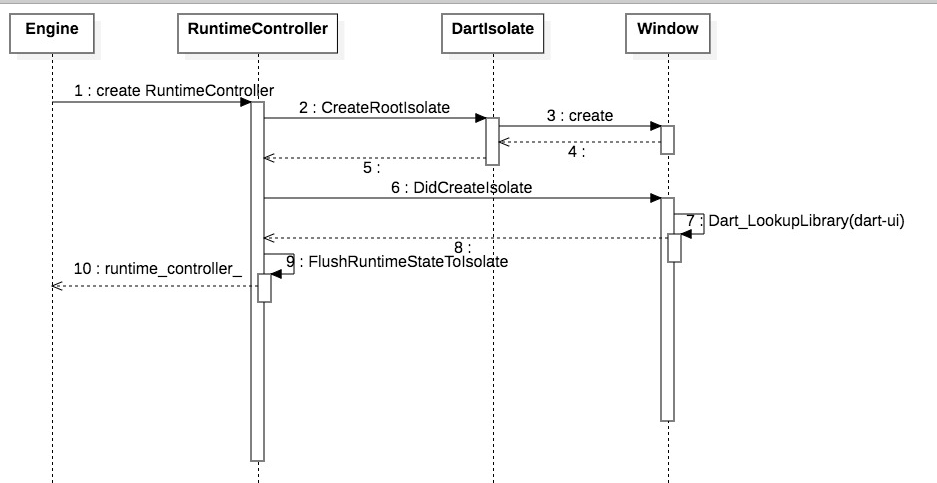
上面是创建Engine的流程图。同样先看一下成员变量
  Engine::Delegate& delegate_;
  const blink::Settings settings_;
  std::unique_ptr<Animator> animator_;
  std::unique_ptr<blink::RuntimeController> runtime_controller_;
  std::string initial_route_;
  blink::ViewportMetrics viewport_metrics_;
  std::shared_ptr<blink::AssetManager> asset_manager_;
  bool activity_running_;
  bool have_surface_;
  blink::FontCollection font_collection_;
最主要的是RuntimeController对象,构造函数中也就是创建了这个对象,其中isolate_snapshot是我们flutter代码的执行程序
Engine::Engine(Delegate& delegate,
               blink::DartVM& vm,
               fml::RefPtr<blink::DartSnapshot> isolate_snapshot,
               fml::RefPtr<blink::DartSnapshot> shared_snapshot,
               blink::TaskRunners task_runners,
               blink::Settings settings,
               std::unique_ptr<Animator> animator,
               fml::WeakPtr<blink::SnapshotDelegate> snapshot_delegate,
               fml::WeakPtr<blink::IOManager> io_manager)
    : delegate_(delegate),
      settings_(std::move(settings)),
      animator_(std::move(animator)),
      activity_running_(false),
      have_surface_(false),
      weak_factory_(this) {

  runtime_controller_ = std::make_unique<blink::RuntimeController>(
      *this,                                 // runtime delegate
      &vm,                                   // VM
      std::move(isolate_snapshot),           // isolate snapshot
      std::move(shared_snapshot),            // shared snapshot
      std::move(task_runners),               // task runners
      std::move(snapshot_delegate),          // snapshot delegate
      std::move(io_manager),                 // io manager
      settings_.advisory_script_uri,         // advisory script uri
      settings_.advisory_script_entrypoint,  // advisory script entrypoint
      settings_.idle_notification_callback   // idle notification callback
  );
}
RuntimeController构造函数
RuntimeController::RuntimeController(
    RuntimeDelegate& p_client,
    DartVM* p_vm,
    fml::RefPtr<DartSnapshot> p_isolate_snapshot,
    fml::RefPtr<DartSnapshot> p_shared_snapshot,
    TaskRunners p_task_runners,
    fml::WeakPtr<SnapshotDelegate> p_snapshot_delegate,
    fml::WeakPtr<IOManager> p_io_manager,
    std::string p_advisory_script_uri,
    std::string p_advisory_script_entrypoint,
    std::function<void(int64_t)> idle_notification_callback,
    WindowData p_window_data)
    : client_(p_client),
      vm_(p_vm),
      isolate_snapshot_(std::move(p_isolate_snapshot)),
      shared_snapshot_(std::move(p_shared_snapshot)),
      task_runners_(p_task_runners),
      snapshot_delegate_(p_snapshot_delegate),
      io_manager_(p_io_manager),
      advisory_script_uri_(p_advisory_script_uri),
      advisory_script_entrypoint_(p_advisory_script_entrypoint),
      idle_notification_callback_(idle_notification_callback),
      window_data_(std::move(p_window_data)),
      root_isolate_(
          DartIsolate::CreateRootIsolate(vm_,
                                         isolate_snapshot_,
                                         shared_snapshot_,
                                         task_runners_,
                                         std::make_unique<Window>(this),
                                         snapshot_delegate_,
                                         io_manager_,
                                         p_advisory_script_uri,
                                         p_advisory_script_entrypoint)) {
  std::shared_ptr<DartIsolate> root_isolate = root_isolate_.lock();
  root_isolate->SetReturnCodeCallback([this](uint32_t code) {
    root_isolate_return_code_ = {true, code};
  });
  if (auto* window = GetWindowIfAvailable()) {
    tonic::DartState::Scope scope(root_isolate);
    window->DidCreateIsolate();
    if (!FlushRuntimeStateToIsolate()) {
      FML_DLOG(ERROR) << "Could not setup intial isolate state.";
    }
  } else {
    FML_DCHECK(false) << "RuntimeController created without window binding.";
  }
  FML_DCHECK(Dart_CurrentIsolate() == nullptr);
}主要是创建Flutter应用的DartIsolate对象(同时创建了Window对象),然后从Isolate对象获取了Window对象。
Window* RuntimeController::GetWindowIfAvailable() {
  std::shared_ptr<DartIsolate> root_isolate = root_isolate_.lock();
  return root_isolate ? root_isolate->window() : nullptr;
}
然后和Dart::UI关联了起来
void Window::DidCreateIsolate() {
  library_.Set(tonic::DartState::Current(),
               Dart_LookupLibrary(tonic::ToDart("dart:ui")));
}
设置成员变量
 if (!shell->Setup(std::move(platform_view),  //
                    std::move(engine),         //
                    std::move(rasterizer),     //
                    std::move(io_manager))     //
  ) {
    return nullptr;
  }
最后把创建的成员变量都保存了下来,如果有一个对象创建失败,就任务初始化失败。
bool Shell::Setup(std::unique_ptr<PlatformView> platform_view,
                  std::unique_ptr<Engine> engine,
                  std::unique_ptr<Rasterizer> rasterizer,
                  std::unique_ptr<IOManager> io_manager) {
  if (is_setup_) {
    return false;
  }

  if (!platform_view || !engine || !rasterizer || !io_manager) {
    return false;
  }

  platform_view_ = std::move(platform_view);
  engine_ = std::move(engine);
  rasterizer_ = std::move(rasterizer);
  io_manager_ = std::move(io_manager);

  is_setup_ = true;

  if (auto vm = blink::DartVM::ForProcessIfInitialized()) {
    vm->GetServiceProtocol().AddHandler(this, GetServiceProtocolDescription());
  }

  PersistentCache::GetCacheForProcess()->AddWorkerTaskRunner(
      task_runners_.GetIOTaskRunner());

  return true;
}
至此Shell全部创建完成,Flutter Engine部分的初始化全部完成。
总结
通过这几篇的学习,基本了解了Flutter在启动后的初始化流程。主要在FlutterView初始化和对应的Engine中初始化UI相关的类。但是中间有非常关键的点是要注意的:
- 一个进程只有一个DartVM
- 一个FlutterView对应一个Shell
- 一个Shell包含PlatformView、IOManager、Rasterizer和Engine
- Engine中创建DartIsolate
- Dart中的Isolate是一个独立的运行空间、其中包含了Platform、IO、GPU、UI四个线程,其中Platform线程是APP主线程所以是功能的
- 如果创建多个FlutterView,他们之间是完全独立的,并且有个各自的一套Shell。
从上面我们可以知道,如果在现有Android项目中引入Flutter,可能会出现多个FlutterActivity。每个Activity都创建一个FlutterView的话就会有多套Shell。这样对内存会有一定的压力。所以目前一些使用的了Flutter的公司都对Engine进行了修改,以达到复用FlutterView来节省内存的目的。
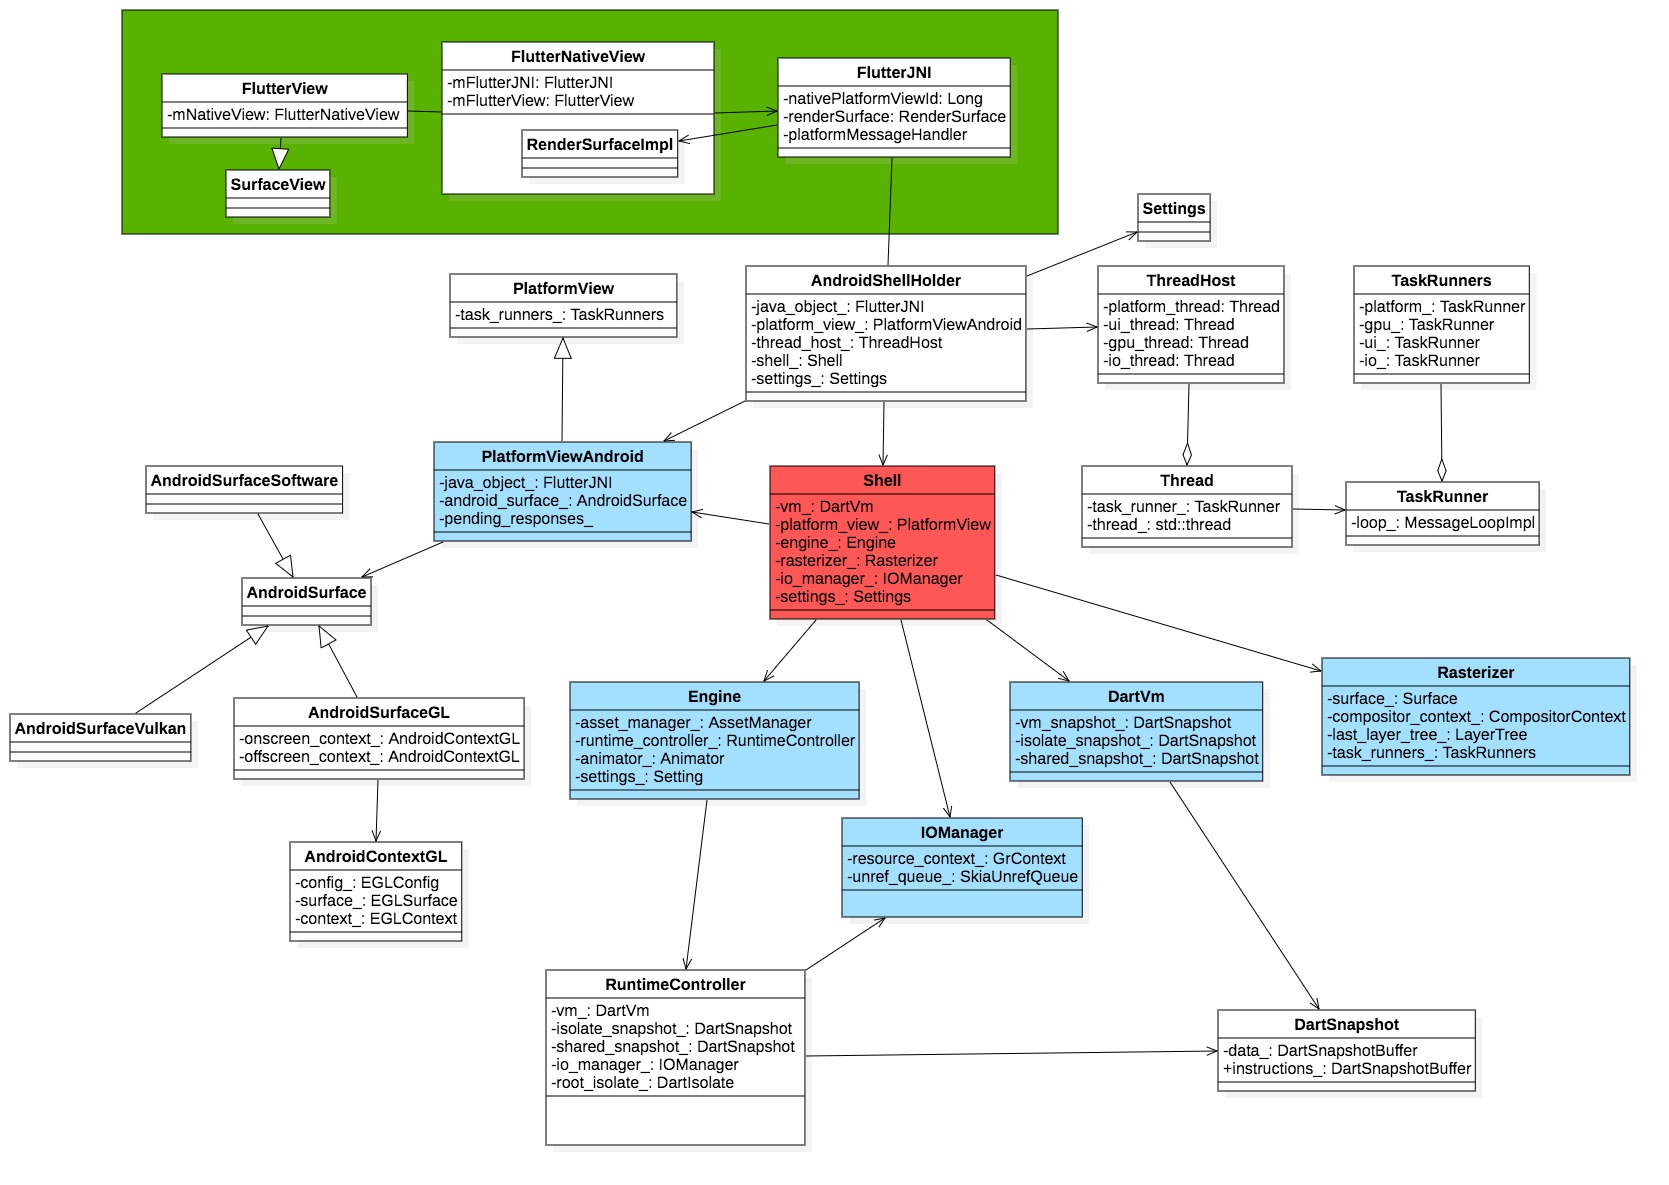
借用一张咸鱼的结构图来清晰的表示类之间的关系(点击查看大图)
下面是更想起的类图关系,绿色是JAVA层的FlutterActivity,其他是Flutter Engine中的类。(点击查看大图)
下面是完整的Flutter初始化的流程图。(点击查看大图)